Tuesday, November 18, 2008

Audio Hijack Pro Console

With Audio Hijack Pro on Mac, it is possible to record and schedule radio streams. With this great program, I can record my favorite records and I can listen to them at any time I want. This is very useful, if you are addicted to talk-radio :-)

Audio Hijack has a nice GUI frontend, but I needed something I can use from remote via SSH. A console version of this program does not exist at the moment, but Audio Hijack is scriptable. So I decided to write a console program using Python and appscripts.

To use it. you first need to install Python for Mac, I think that is all.

Script can be get here: ahconsole
Copy the script to wherever you want, and run it with:
./ahconsole.py

Short keymap:
- press 'l' to list all sessions
- press 't' to list all timers of selected session
if no session is selected, timers of all sections are listed
- press 'q' to quit
- press 's' and session number to select session
- press 'h' to get a help screen.

With it, you are able to manage your audio hijack pro timers easily.
Action keymap:
add timer
(1) select session
(2) press 'a' to add timer
(3) follow instructions

change start time of timer
(1) select session
(2) press 'cb' and enter start time (YYYY-MM-DD hh:mm:ss)

change duration of timer
(1) select session
(2) press 'cd' and enter duration (in minutes)

change schedule weekdays of timer
(1) select session
(2) press 'cs' and switch weekdays with keys (0-6) starting with 0=monday, 6=sunday

change actions of timer (record, mute)
(1) select session
(2) press 'ca' and follow instructions

activate/deactivate timer
(1) select session
(2) press 'ce' and follow instructions

remove timer
(1) select session
(2) press 'cr' and follow instructions


Feel free to use it, and tell me if you like it.

Monday, November 17, 2008

HOWTO: run vuze from console


The bittorrent client vuze (formerly known as azureus) supports a console frontend, so you can manage your torrents in headless mode.

Install vuze from azureus.sourceforge.net
Start it with gui and configure your vuze-settings, download-folder, ports and so on.

If you start vuze with command-line option -ui=console, vuze runs in console. To use the same config as you configured in the gui, you
have to do following:

create a shell script in your home directory:
vuze-console:


**************************************
#!/bin/sh
cd /Applications/Vuze.app/Contents/Resources/Java
java -Dazureus.config.path=/Users/YOUR_USER-NAME/Library/Application Support/Vuze -jar Azureus2.jar -ui=console


The go in screen and run ./vuze-console
A few exceptions of unfound plugins could be occure, 
but you can ignore them.

short keymap:
a URL     - add torrent
sh t         - show all torrents
sh t c      - show all complete torrents
m #        - move torrent on top of queue
r #          - remove torrent (# = torrent number)
help       - more help

HOWTO prepare your mac-mini to headless mode

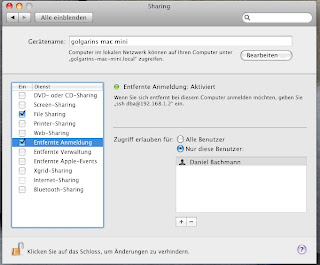
First you have to enable your ssh-deamon on your mac. Go to system properties and enable remote connection.

Before, you should change your standard ssh-port 22 to another port for security reasons.
Change port 22 to whatever you want in /etc/sshd_config and save (need administrator privileges).

If you are behind a router, you should forward this port to you local ip (get with ifconfig -a).

If your router supports dynamic dns, you can access your mac-mini from any place of the world, you only need a terminal or PuTTy (on Windows). Besides, you should create an account on dyndns.com to use dynamic dns.

Open terminal and create a screen with title you want:
screen -S mac-mini
Inside screen, you can now do what you want, e.g. start top

Now you can connect remote with:
> ssh -p port user@host
e.g ssh -p 1234 dba@golgarin.podzone.org

Attach to screen with ctrl +a +x.

Voila, you should now see the top you started before.

screen is very useful, here is a short keymap:
screen (starts a screen session) 
ctrl +a +x (reattach to an existing screen session)
ctrl +a +d (detach from screen session)

ctrl +a +c (create a new screen)
ctrl +a +n (step to next screen)
ctrl +a +p (step to previous screen)
ctrl +a +? (screen help for further details)


Now you can do a lot of cool stuff inside the screen, e.g. running a torrent client, managing
your audio recordings remotely and so on.